Room 506 Meetings
Room Telephone: +44 141 339 8855 extn. 0098Room PC: vc506.physics.gla.ac.uk (130.209.204.190)
Room 506 can be used for video or telephone conferencing or local meetings. Any meetings should be booked in the Meeting Room Booking System. To request a booking email Daphne Davidson (d.davidson@physics.gla.ac.uk) or in her absence Valerie Flood (v.flood@physics.gla.ac.uk). If the room is to be used for a video conference it is a good idea to request a room booking for 30 minutes before the start of the meeting. This will prevent any unforeseen circumstances from delaying the start of the meeting. If any of the instructions given in this documentation are unclear or you encounter a technical problem while using the equipment contact Andrew Fraser (a.fraser@physics.gla.ac.uk) for further assistance.
Power for Laptops
There are a number of 4-way power adapters in the cupboard next to the radiator. These power adapters can be connected to existing 4-way under the table to give laptop users more power sockets. Please replace any additional 4-way power adapters back in the cupboard, leaving the one routed through the gray cable protector in place.
Local Meetings
Slides can be projected either using the rooms Desktop PC (vc506) or by using a laptop.Desktop PC
- Login using the local account name vrvsevo
- Please ask Andrew Fraser for the password to this account well before your meeting starts.
- This is a local account and vc506 should be selected instead of guphysics.
- Select "Desktop" on the passive video switcher.
- Turn on the projector by using the projector remote.
- Make sure the video splitter is on.
Laptop
- Connect the laptop to the long VGA cable provided.
- Select "Laptop" on the passive video switcher.
- Turn on the projector by using the projector remote.
- Make sure the video splitter is on.
Telephone Conferencing
- Make sure the "ClearOne RAV900" system is on. (The RAV900 system is connected to the 6-way power distribution board.)
- Make sure the microphone pods are arranged as illustrated in figure 1.
- Un-mute the microphones as needed: (red => muted, green => live)
- Dial the number including the '9' prefix as needed and press the call button on the left hand side of the controller.
- Follow the "Local Meetings" instructions for any slides that need to be shown during the meeting.
Video Conferencing
- Make sure the "ClearOne RAV900" system is on.
- Make sure the microphone pods are arranged as illustrated in figure 1.
- Make sure the "Sony EVID70" video camera is on.
- Follow the "Local Meetings" instructions to log into the PC.
- Follow the "Local Meetings" instructions for any slides that need to be shown during the meeting.
- Follow one of the sub-sections below to connect to your meeting.
EVO
- Open a web browser and go to http://evo.caltech.edu/.
- Click on "ENTER".
- If you have not used EVO before, click on "Register" and follow the instructions given.
- Click on "Start" and enter your user name and password.
- Join an EVO meeting.
- On the "vievo" window click on "SETUP".
- Then select "Bandwidth" 1.23Mb/s, "Framerate" 24f/s, "Quality" 2. Select "Desktop" then click on "Capture" and choose "whole screen".
- Then click on "Close".
Transmitting Slides
If the Desktop PC is being used to show slides the current slide can
be transmitted over EVO by transmitting the desktop. To transmit the
desktop click on "DESKTOP" at the top of the "vievo" window. To switch
back to the camera click on "CAMERA".
VRVS
- Open a web browser and go to http://www.vrvs.org/.
- If you have not used VRVS before, click on "REGISTER" and follow the instructions given.
- Click on "LOGIN" and enter your user name and password.
- Join one of the virtual rooms by clicking on "ENTER" followed by the "Subject" name.
- Connect to the room with "MBone Tools".
- On the Vic window click on "Settings". Then click on "Show advanced settings".
- Click on "Preset values" and choose "No Limit".
- Click on "Source" and select "Microsoft WDM Image Capture (Win32)".
- Click on "Save settings"
- On the RAT window click on "Settings"
- Click on Category and select Audio.
- Select "Audio Device" as the "SoundMAX HD Audio"
- Select the "Sample Rate:" as "16-kHz".
- Click on "Apply"
H323
- Start Polycom PVX by clicking on
Start->Programs->Polycom PVX->Polycom PVX
- Then connect to your meeting following the Polycom documentation.
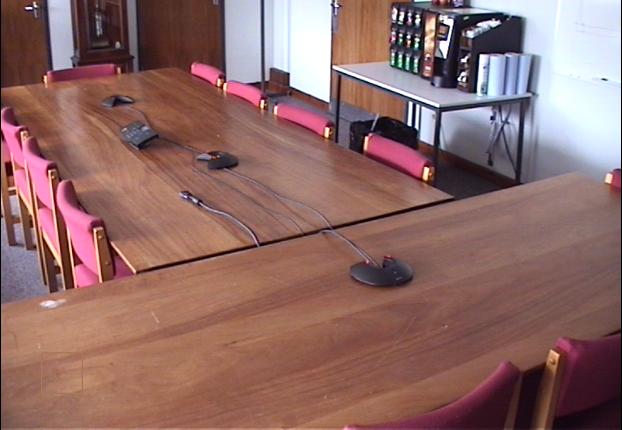
Figure 1: A picture of room 506 with a
correct arrangement of conferencing microphone pods and table-top controller.
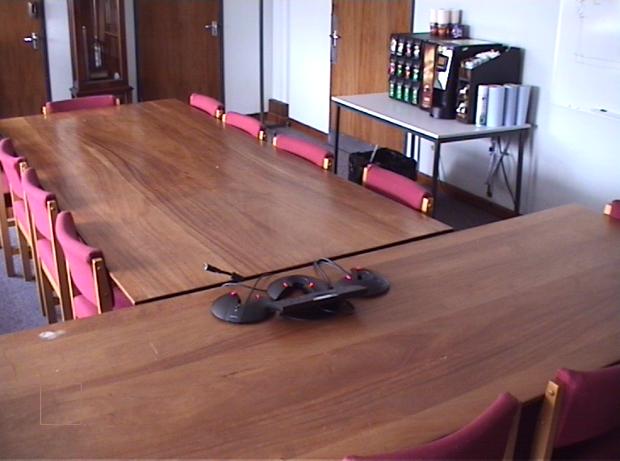
Figure 2: A picture of room 506 after the
microphones have been tidied away.
Controlling the Sony EVID70 camera
The Sony EVID70 camera currently has three defined presets. These presets are given in table 1 and illustrated in figures 3 to 5.
| Preset Number | 1 | 2 | 3 |
|---|---|---|---|
| Definition | None | Room | None |
| Preset Number | 4 | 5 | 6 |
| Definition | Speaker | None | White Board |
Table 1: A table of Sony EVID70 presets and their values.
Figure 3: Room preset
Figure 4: Speaker preset
Figure 5: White board preset
Video and Telephone Conferencing
- Follow the Video Conferencing intructions.
- Disconnect the telephone handset from the two way splitter.
- Connect a Conference Telephone instead and dial as normal. There is a spare black cable cover under the side table for covering the conference telephone flex.
Equipment Connections
The video conference equipment should never be disconnected or modified by users. Please call a system administrator if you find any of the connections are wrong or any of the equipment is faulty.
The Sony EVID70 is connected to the ViewCast Osprey 100 video capture card mounted in the PC by a S-Video cable. The Sony camera receives power from the 6-way distribution board. The cable from the distribution board teminates at a small black transformer. This transformer should sit on top of the theses and not be pushed down the back in case it over heats.
A 2-way telephone splitter is connected to the telephone socket: the telephone handset is connected to one socket and an extension lead running to the ClearOne RAV900 system is connected to the other. The telephone extension lead terminates in an adapter, followed by a small section of black cable connected to the "TELEPHONE LINE".
Each of the Bose speakers are connected by speaker cable that runs along the top of the bookcase to the ClearOne RAV900 main unit. The connections should be made to the left and right sockets as indicated on the reverse of the ClearOne RAV900 main unit.
The ClearOne RAV900 "LINE IN" is connected to the computers line in which has a (blue/pink) label at the PC. The connection is made via mono-phono to phono to mini-jack such that the mono audio is connected to both of the PC audio channels rather than just one of them. If this connection needs to be remade turn the PC on and then reconnect the lead. When the connection is reconnected the PC will ask if the connection should be a microphone of a line in. Choose a line in connection.
The ClearOne RAV900 "LINE OUT" is connected to the computers line out which has a green label at the PC. The connection is made via mono-phono to phono to mini-jack such that the mono audio is connected to both of the PC audio channels rather than just one of them.
A USB cable runs from the front of the ClearOne RAV900 system to the back of the PC. This is present to allow the RAV900 system to be configured using RAV-Ware installed on the PC. Normal users should not have to access the RAV900 using RAV-Ware.
The ClearOne RAV900 "MIC POD IN" is connected to Microphone pod 1. The other 2 microphones then follow in a daisy chain from this one.
The table top controller is connected to the ClearOne RAV900 main unit's "RS232" port.
The video output from the desktop PC is connected to connection "A" at the back of the passive splitter. Connection "B" is connected to the 10m VGA cable for laptop users. The "I/O" socket is connected to the video splitter that sits underneath. The "Monitor" connection on the video splitter is connected to the PC's monitor. The other output from the video splitter is connected to the projector.
Reference Documents
- ClearOne RAV 900 http://www.clearone.com/support/library.php?content=main&product=89
- Polycom PVX http://www.polycom.com/usa/en/support/video/pvx.html
- Sony EVID70 http://bssc.sel.sony.com/BroadcastandBusiness/DisplayModel?id=72199
- ViewCast Osprey 100 http://www.viewcast.com/pages.asp?page=osprey-100